Module 3 · Candlesticks & Price Action · Lesson 5
Price Action Confirmation: How to Build a Complete Entry Setup Before You Trade
Learn how to combine market structure, location, liquidity, candlesticks, momentum and confirmation into one repeatable process for evaluating a trade before risking money.
Price Action
Confirmation
Entry Setup
Execution
By now, you know how to recognize bullish and bearish candles, rejection wicks, pin bars, engulfing candles, momentum shifts, doji candles, inside bars and compression.
But recognizing these patterns is not the same as knowing when to enter a trade.
A professional trading decision requires several pieces of information to work together.
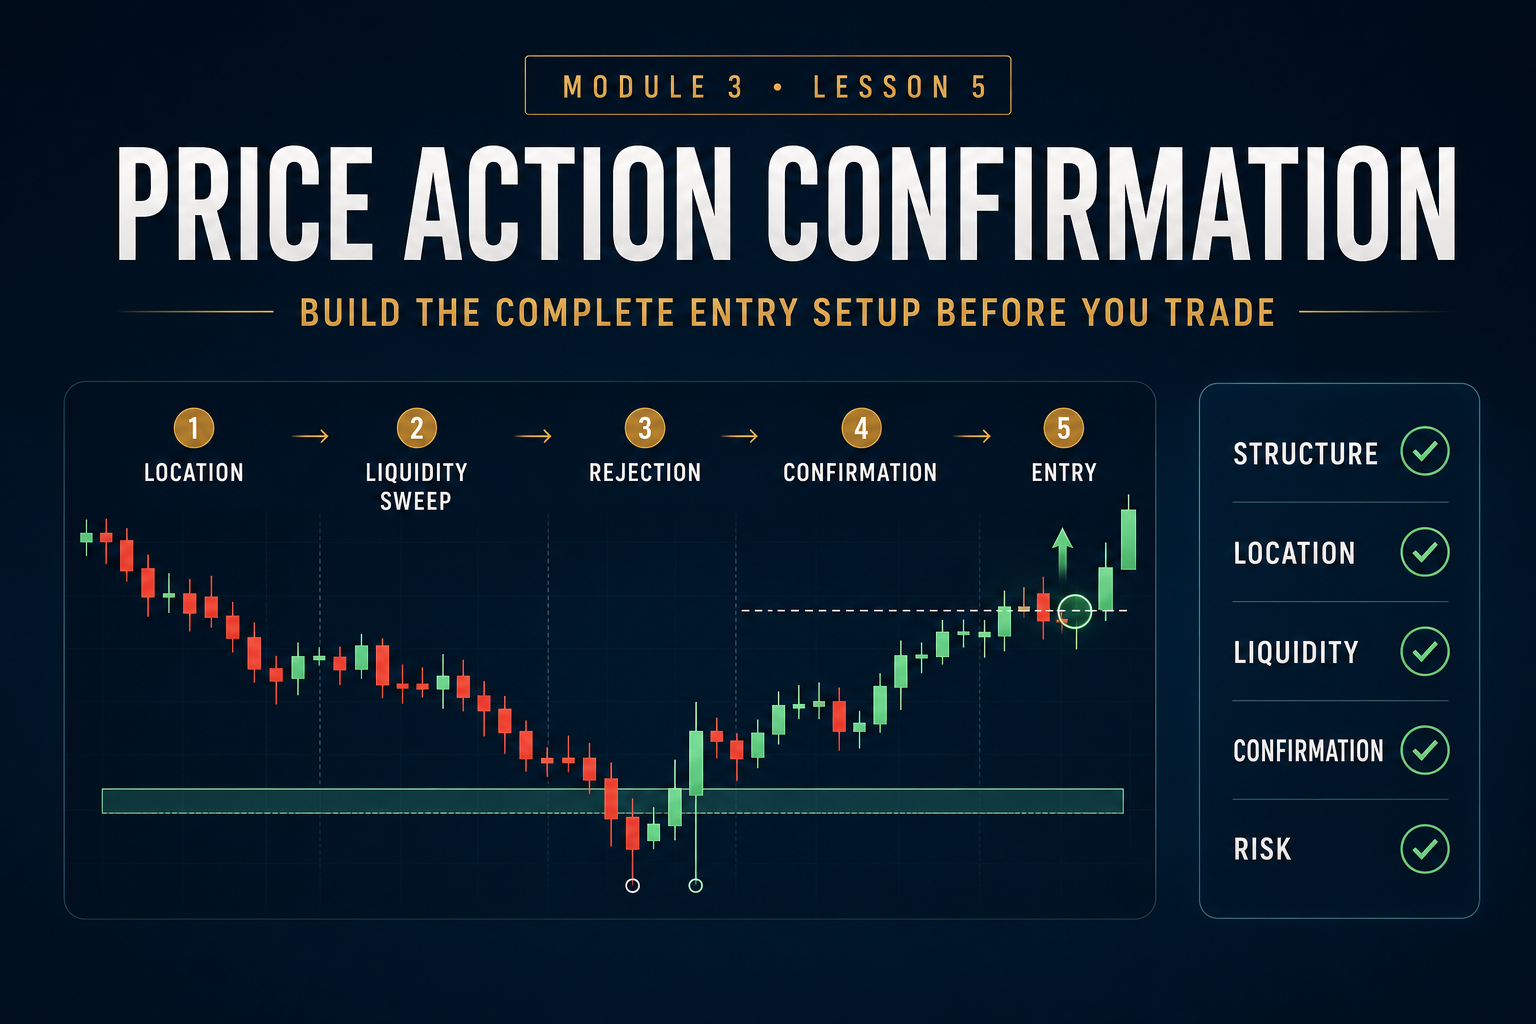
Confirmation is not one magical candle. Confirmation is the moment several pieces of market evidence begin pointing toward the same trade idea.
This lesson brings Modules 1, 2 and 3 together and shows you how to build a complete price-action entry framework.
Lesson Objectives
What You’ll Learn
✓ What price-action confirmation means
✓ Why location comes before entry
✓ How liquidity strengthens setups
✓ How candles confirm control
✓ How to choose entry and invalidation
✓ How to reject low-quality trades
What Is Price Action Confirmation?
Price-action confirmation is evidence that the market is behaving in a way that supports your planned trade direction.
It may include rejection, an engulfing candle, a break of structure, a liquidity sweep, displacement, a successful retest or several of these factors working together.
Core Principle
Confirmation reduces guessing. It does not eliminate risk.
Setup Conditions vs. Entry Trigger
A useful way to organize trading decisions is to separate the setup from the trigger.
Setup Conditions
Why the Trade Might Exist
Structure, trend, location, support/resistance, liquidity and higher-timeframe context.
Entry Trigger
Why You Enter Now
Rejection, engulfing, CHoCH, BOS, displacement, retest or another defined confirmation.
Location creates the opportunity. Confirmation activates the setup.
The Six Layers of a Complete Price Action Setup
1. Structure: What is the market doing?
2. Location: Where is price relative to important levels?
3. Liquidity: Has an important high or low been attacked or swept?
4. Reaction: Is price rejecting, engulfing or showing momentum?
5. Confirmation: Has control actually shifted?
6. Risk: Does the entry make mathematical sense?
Layer 1: Market Structure
Before looking for candles, determine the structure.
✓ Bullish trend: higher highs and higher lows
✓ Bearish trend: lower highs and lower lows
✓ Range: price contained between boundaries
✓ Transition: structure beginning to break or change
✓ Multi-timeframe context: larger trend vs. smaller pullback
You should know whether you are trading with existing structure, against it, or attempting to trade a potential transition.
Layer 2: Price Location
Good price action in a bad location can still produce a bad trade.
Higher-Timeframe Support
Potential location for bullish reaction.
Higher-Timeframe Resistance
Potential location for bearish reaction.
Previous Swing Level
Can become a reaction or liquidity area.
Range Boundary
Can become an important decision point.
Do not ask “Is this a bullish candle?” before asking “Where is this bullish candle forming?”
Layer 3: Liquidity
Previous highs, lows and range boundaries frequently attract orders.
A sweep of one of these areas followed by a strong rejection can improve the context of a setup.
Bullish Example
Previous Low → Sweep Below → Reclaim → Buyers Respond
Bearish Example
Previous High → Sweep Above → Reject → Sellers Respond
Layer 4: Read the Reaction
Once price reaches the area you care about, stop predicting and watch what happens.
Useful Reaction Evidence
✓ Long rejection wick
✓ Pin bar
✓ Engulfing candle
✓ Strong candle close
✓ Failed breakout
✓ Momentum expansion
Reaction tells you the market noticed the level. Confirmation tells you whether control may actually be changing.
Layer 5: Confirm the Change in Control
This is where many traders enter too early.
They see rejection and immediately assume reversal.
A more conservative approach waits for additional evidence.
CHoCH
Opposing short-term structure begins to break.
Engulfing
New side aggressively overwhelms previous candle pressure.
Displacement
Price moves decisively away from the reaction area.
Retest
Price returns to the broken level and holds.
Layer 6: The Trade Must Still Make Sense Mathematically
Confirmation does not automatically make a trade worth taking.
You still need a logical stop, realistic target and acceptable risk-to-reward.
Beautiful confirmation: Yes
Stop distance: 70 pips
Next major obstacle: 25 pips away
Good analysis does not automatically equal a good trade.
Complete Bullish Price Action Setup
Step-by-Step
1. Higher-Timeframe Structure: Bullish.
2. Location: Price pulls back to established support.
3. Liquidity: Previous short-term low is swept.
4. Rejection: Long lower wick closes back above support.
5. Momentum: Bullish engulfing candle follows.
6. Structure: Previous lower high is broken.
7. Retest: Broken structure holds.
8. Risk: Entry, stop, target and lot size are defined.
No single candle created the setup. The alignment of structure, location, liquidity and confirmation created the setup.
Complete Bearish Price Action Setup
1. Structure: Higher timeframe bearish.
2. Location: Price rallies into resistance.
3. Liquidity: Previous swing high is swept.
4. Rejection: Long upper wick develops.
5. Momentum: Bearish engulfing candle forms.
6. Structure: Minor higher low breaks.
7. Retest: Former support becomes resistance.
8. Risk: Downside target provides acceptable reward.
What Is Confluence?
Confluence means several independent pieces of analysis support the same trade idea.
✓ Higher-timeframe trend
✓ Major support or resistance
✓ Liquidity sweep
✓ Rejection candle
✓ Engulfing momentum
✓ CHoCH or BOS
✓ Clean risk-to-reward
Confluence does not mean collecting ten indicators that all measure the same thing. It means different forms of evidence support one coherent market story.
Can You Wait for Too Much Confirmation?
Yes.
If you wait until the trend is obvious, the structure has broken, price has moved 100 pips, three engulfing candles have printed and everyone can see the move, your entry may be extremely late.
Too Early
Entering before the market provides evidence.
Too Late
Waiting until most of the move has already happened.
Your strategy needs enough confirmation to justify the trade — but not so much that there is no trade left.
Aggressive vs. Conservative Entry
| Entry Style |
Possible Trigger |
Advantage |
Tradeoff |
| Aggressive |
Rejection candle close |
Earlier entry |
Less confirmation |
| Moderate |
Engulfing / structure break |
More evidence |
Worse entry price |
| Conservative |
Break + retest + confirmation |
More confirmation |
Trade may leave without retest |
There is no universally “best” entry style. The important thing is that your trading plan defines exactly what confirmation you require.
Define the Entry Before You Click Buy or Sell
A trade should not begin with an emotional click.
Your entry condition should already be known.
Example Entry Rule:
“After price sweeps support, I wait for a bullish candle close above the previous lower high before entering.”
That is far more objective than saying, “It looks like it might go up.”
Define Invalidation Before Entry
Invalidation is the price behavior that proves your trade idea is wrong.
Your stop loss should protect you when the trade thesis fails — not when you simply become uncomfortable.
This is why structure and price action should determine your stop before position size is calculated.
Define the Target Before the Trade
Your target should be based on logical market structure rather than hope.
Potential Target Areas
• Previous swing high
• Previous swing low
• Next resistance
• Next support
• Opposing liquidity
• Defined R-multiple
Confirmation → Entry → Stop → Target → Position Size
The order matters.
Market Setup
↓
Confirmation
↓
Entry Price
↓
Invalidation / Stop
↓
Target
↓
Position Size
Do not choose your lot size first and then force the stop loss to fit it.
A Good Trader Needs a “No Trade” Condition
Not every analysis should end with an order.
Skip the Trade When:
✕ Structure is unclear.
✕ Price is in the middle of nowhere.
✕ Confirmation never arrives.
✕ Entry requires chasing an extended move.
✕ Stop placement is unclear.
✕ Target is blocked by nearby structure.
✕ Risk-to-reward does not justify the trade.
Passing on a weak trade is a successful trading decision.
Grade Your Setups Instead of Treating Them Equally
A useful way to improve discipline is to separate high-quality setups from marginal ones.
A-Quality Setup
✓ Clear structure
✓ Strong location
✓ Liquidity event
✓ Strong confirmation
✓ Logical stop
✓ Attractive reward
Free Academy Access
Unlock the rest of this lesson free
Sign in to continue, or create a 100% free Academy account and unlock the full member experience.
ALREADY A MEMBER?
Sign In & Continue
Access the rest of this lesson instantly.
Forgot password?

 14 min
 11 min
 13 min